Documentation Index
Fetch the complete documentation index at: https://docs.qbraid.com/llms.txt
Use this file to discover all available pages before exploring further.
Overview
Intel® Quantum SDK is a C++ based API that allows users to write software targeted for Intel quantum hardware. It is available as a
pre-installed environment on qBraid Lab, and is free to access for all users.
To cite the Intel® Quantum SDK, please reference:
Khalate, P., Wu, X.-C., Premaratne, S., Hogaboam, J., Holmes, A., Schmitz, A., Guerreschi, G. G., Zou, X. & Matsuura, A. Y., arXiv:2202.11142 (2022)
Getting Started
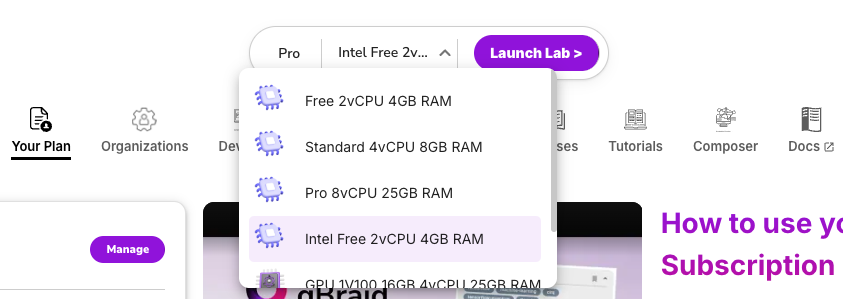
Select Image & Launch Lab
At the top of your account page, open the image drop down. Select the option named Intel Free 2vCPU 4GB, and then click Launch Lab.
Pulling the Intel image may take 2-3 minutes the first time. The next time you launch Lab, it will load much more quickly.
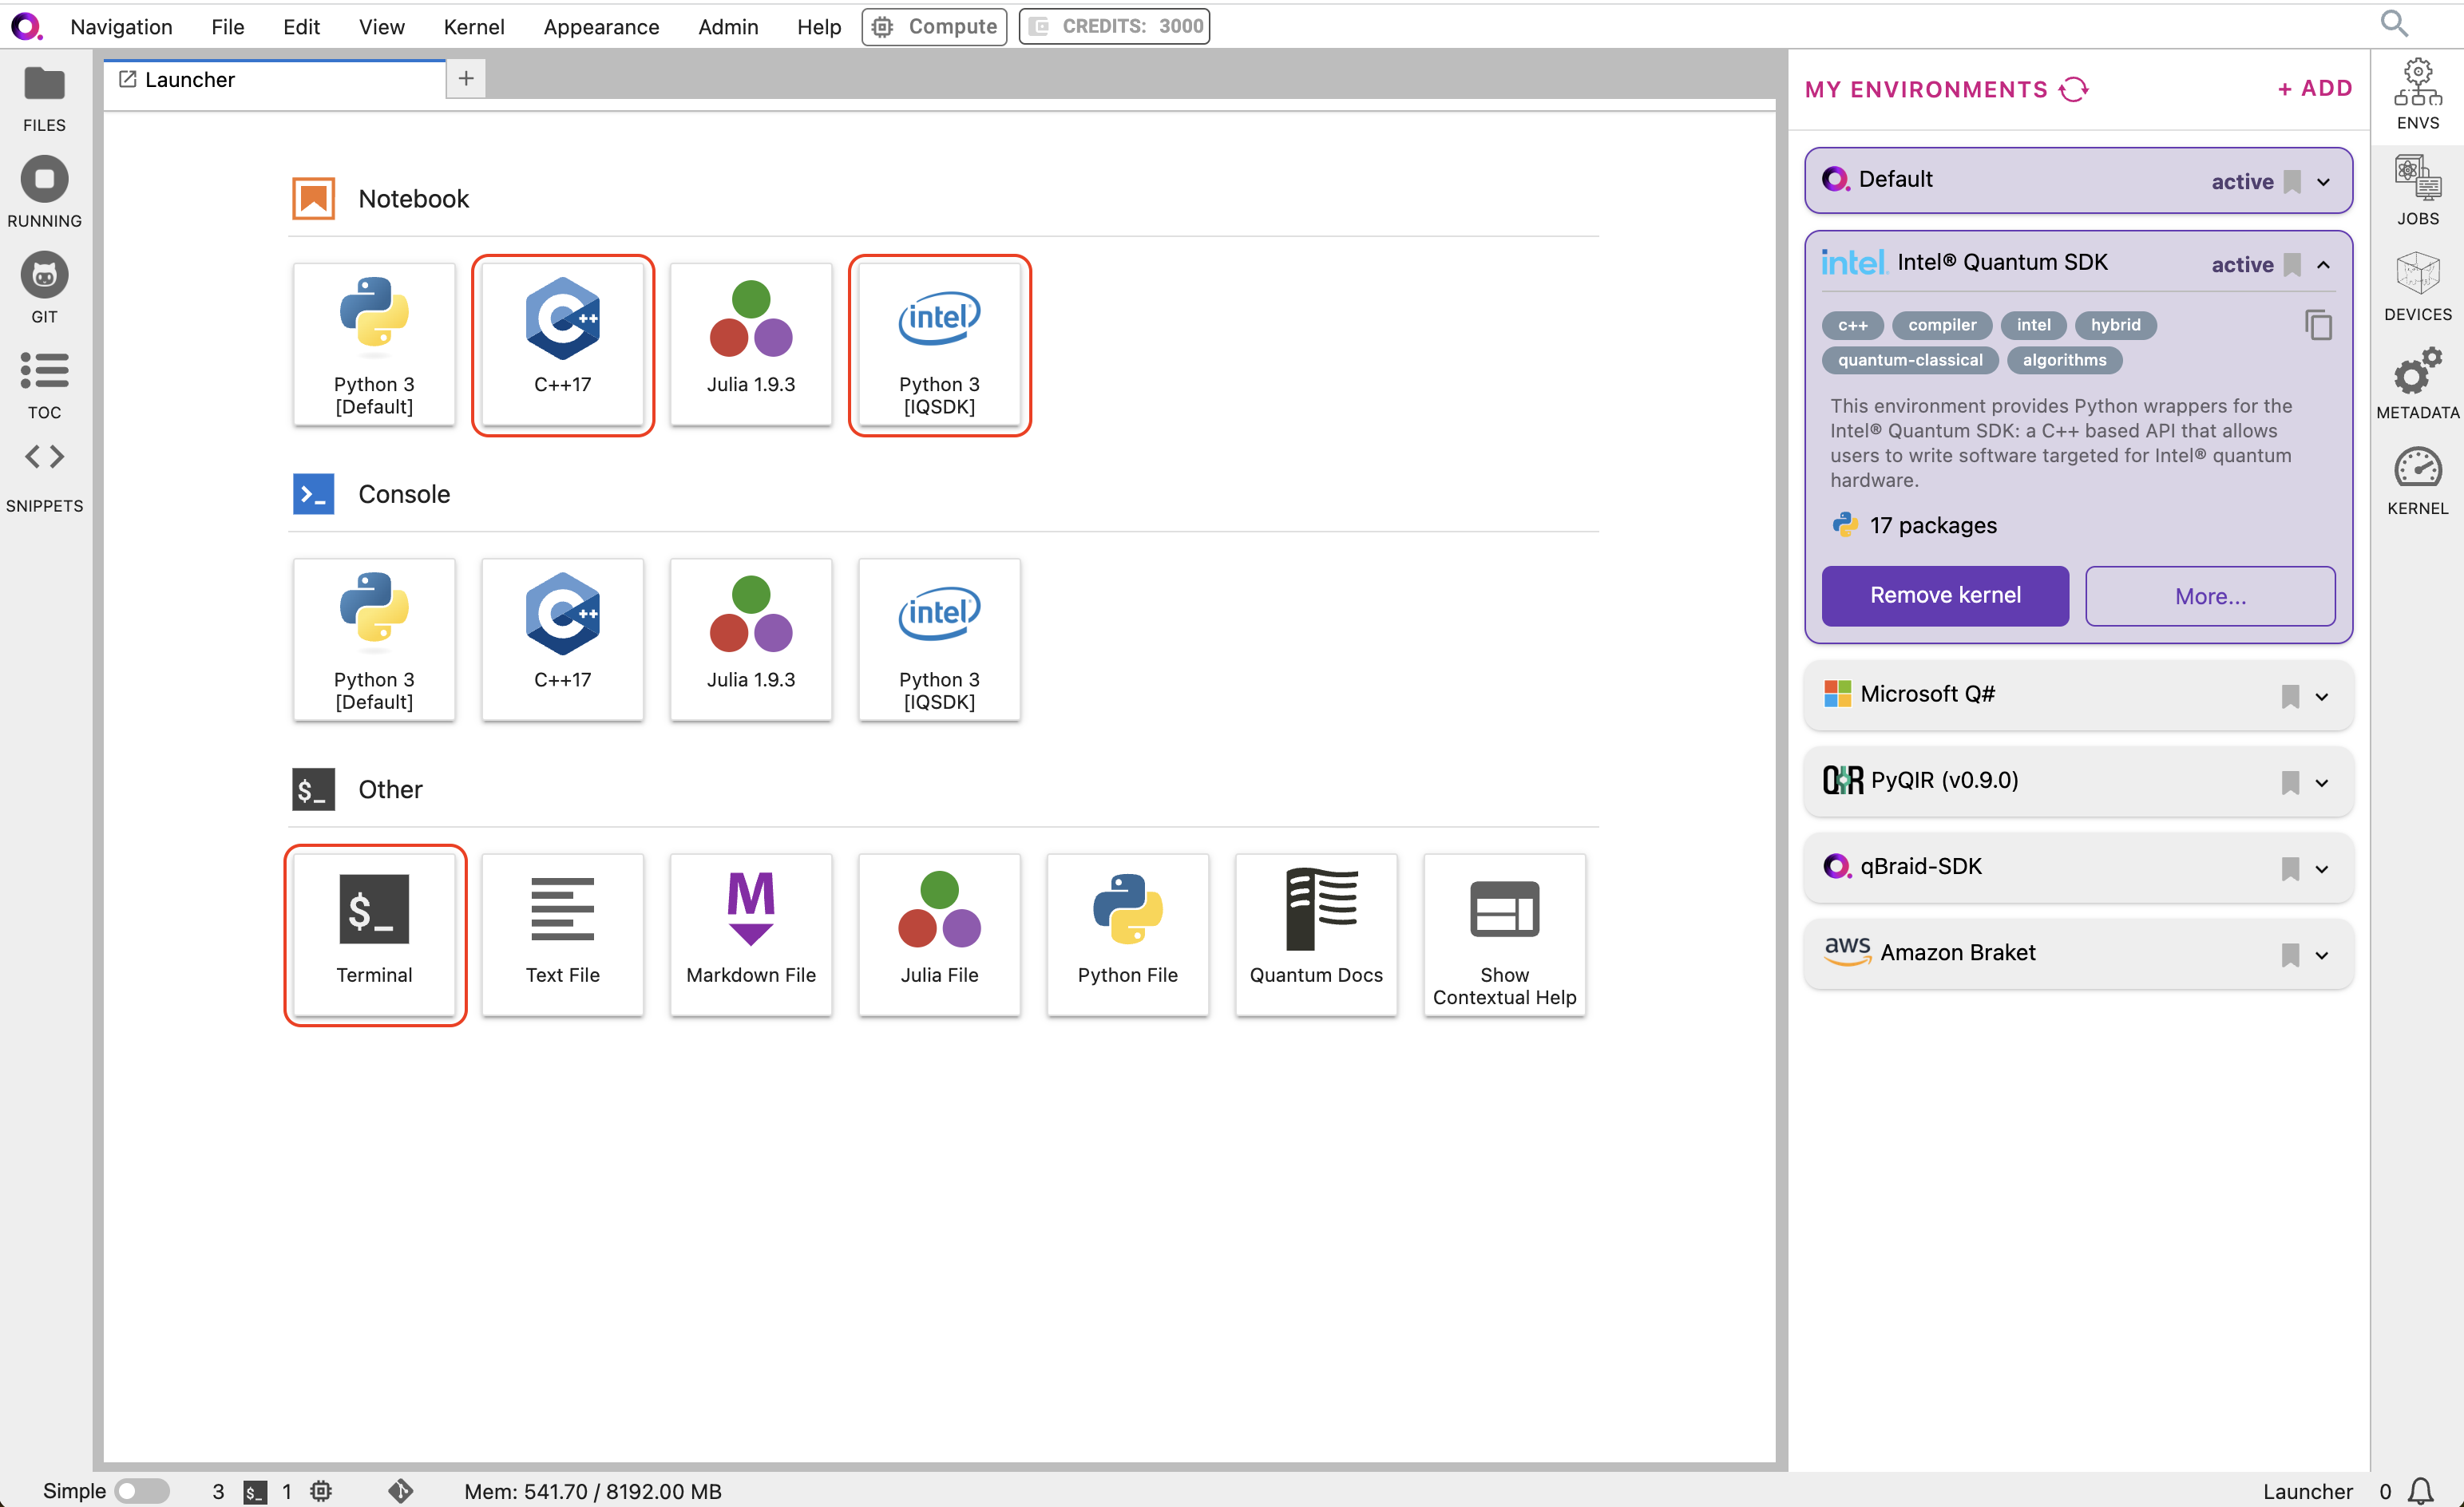
Add Python kernel
The Intel® Quantum SDK is designed to interoperate with Python software environments. To use this feature, in the
right sidebar of qBraid Lab, locate and expand the Intel® Quantum SDK environment panel and click Add Kernel.
This will create a new Python 3 kernel (marked IQSDK), which you will use to create and run your first notebook.
Python Interface
The Intel® Quantum SDK Python Interface provides an API to run quantum algorithms using Python 3, through the intelqsdk.cbindings library.
The standard approach to using the Intel® Quantum SDK is to provide a quantum_kernel as C++ source in your Python environment and then
expose that kernel for operation. A second approach for interacting with Python is via the Intel® Quantum Compiler OpenQASM Bridge:
-
Write
quantum_kernel functions in C++, compile to a .so shared object file, setup the Intel® Quantum Simulator and call the
intelqsdk.cbindings APIs from Python.
-
Write quantum circuits in OpenQASM 2.0, convert that to a
quantum_kernel source in C++, and use the intelqsdk.cbindings
library as before, all from within Python.
qBraid Specific Instructions
On qBraid, the Intel® Quantum SDK Python interface is installed in a dedicated virtual environment
with environment ID intel_dk7c2g.
Before running a notebook, make sure that the Intel® Quantum SDK kernel is active. Then,
make sure it is enabled for the current notebook by selecting
Python [IQSDK] in the kernel selector in the top-right of your menu bar.
For terminal users, the environment path is discoverable via the qBraid CLI as follows:
$ qbraid envs list
# installed environments:
#
default                  /opt/.qbraid/environments/qbraid_000000
intel                    /opt/.qbraid/environments/intel_dk7c2g
...
$ qbraid envs activate intel
$ python3 <path_to_your_script>
$ /opt/.qbraid.environments/indel_dk7c2g/pyenv/bin/python3 <path_to_your_script>
intel environment directory.
/opt/.qbraid/environments/intel_dk7c2g/intel-quantum-compiler
Your First C++ Quantum Kernel
We will create and manipulate a quantum_kernel running on the Intel® Quantum Simulator directly in your notebook. This first kernel will
demonstrate a simple quantum Bell state as a common and familiar quantum computing example.
import intelqsdk.cbindings as iqsdk

compiler = "/opt/.qbraid/environments/intel_dk7c2g/intel-quantum-compiler"

num_qubits = 2

# Create the Python interpolated 2 qubit C++ Bell state source
Bell_source = f"""
#include <clang/Quantum/quintrinsics.h>

// Establish the classical and quantum kernel variables
cbit c[{num_qubits}];
qbit q[{num_qubits}];

// Our Bell state Quantum Kernel
quantum_kernel void bell()
{{
    H(q[0]);
    CNOT(q[0], q[1]);
    MeasZ(q[0], c[0]);
    MeasZ(q[1], c[1]);
}}
"""

# Create the Intel® Quantum SDK source file bell.cpp
with open("bell.cpp", "w", encoding="utf-8") as output_file:
    print(Bell_source, file=output_file)

# Generate the Intel® Quantum SDK shared object file bell.so
iqsdk.compileProgram(compiler, "bell.cpp", "-s")

# Expose and label the Intel® Quantum SDK shared object as "my_bell"
iqsdk.loadSdk("./bell.so", "my_bell")

# Setup the Intel® Quantum Simulator to execute the quantum kernel
iqs_config = iqsdk.IqsConfig()
iqs_config.num_qubits = num_qubits
iqs_config.simulation_type = "noiseless"
iqs_device = iqsdk.FullStateSimulator(iqs_config)
iqs_device.ready()

# Invoke the quantum_kernel "bell" defined in the C++ source above
iqsdk.callCppFunction("bell", "my_bell")

# Establish references to the quantum kernel qubits
qbit_ref = iqsdk.RefVec()
for i in range(num_qubits):
    qbit_ref.append( iqsdk.QbitRef("q", i, "my_bell").get_ref() )

# Print the probabilities of the quantum system
probabilities = iqs_device.getProbabilities(qbit_ref)
iqsdk.FullStateSimulator.displayProbabilities(probabilities, qbit_ref)

# Printing probability register of size 4
# |00>    : 0                             |10>    : 0
# |01>    : 0                             |11>    : 1
OpenQASM Support
Intel® Quantum SDK provides a source-to-source converter which takes OpenQASM code and converts it into C++ for use with the Intel® Quantum SDK.
This converter requires Python >= 3.10. Currently, it only processes OpenQASM 2.0 compliant code as described by the Open Quantum Assembly Language
paper: arXiv:1707.03429.
To translate an OpenQASM source to a C++ file, you can run the Intel® Quantum Compiler with the -B flag to generate the corresponding
quantum_kernel functions in C++ source format. If you are working from the terminal CLI with a pre-existing OpenQASM file simply
use the following syntax to create your C++ quantum_kernel source file:
$ intel-quantum-compiler -B example.qasm
# Create the Python interpolated 2 qubit OpenQASM Bell state source
Bell_source = f"""
OPENQASM 2.0;
qreg q[{num_qubits}];
creg c[{num_qubits}];
h q[0];
cx q[0],q[1];
measure q[0] -> c[0];
measure q[1] -> c[1];
"""

# Create the OpenQASM 2.0 source file bell.qasm
with open("bell.qasm", "w", encoding="utf-8") as output_file:
    print(Bell_source, file=output_file)

# Create the Intel® Quantum SDK source file bell.cpp
iqsdk.compileProgram(compiler, "bell.qasm", "-B")
from qiskit import QuantumCircuit

# Create Qiskit bell circuit with measurement over both qubits
circuit = QuantumCircuit(2, 2)
circuit.h(0)
circuit.cx(0, 1)
circuit.measure([0, 1], [0, 1])

Bell_source = circuit.qasm()