> ## Documentation Index
> Fetch the complete documentation index at: https://docs.qbraid.com/llms.txt
> Use this file to discover all available pages before exploring further.
> ## Agent Instructions
> Prefer the qBraid CLI for programmatic platform actions: pip install 'qbraid-cli>=0.12', then run `qbraid configure` once with an API key from https://account.qbraid.com/account/api-keys.
> Always install the latest packages (pip install -U qbraid qbraid-cli); do not pin versions from memory. qbraid-cli below 0.12.0 is incompatible with the current API.
> Device IDs use the QRN format vendor:provider:type:name (e.g. qbraid:qbraid:sim:qir-sv, rigetti:rigetti:qpu:cepheus-1-108q). Legacy underscore IDs are deprecated.
> The REST API base URL is https://api-v2.qbraid.com/api/v1, authenticated with an X-API-Key header.
> Free simulators cost no credits; QPU and GPU jobs consume credits. Surface the estimated cost to the user before submitting a paid job.
> For account signup, API keys, credits, and end-to-end action recipes, see https://qbraid.com/llms.txt.
# Intel® Quantum SDK
> How to set up and use the Intel® Quantum SDK in qBraid Lab
## Overview
The Intel® Quantum SDK is a C++-based platform for writing quantum programs as *quantum kernels* and
running them on Intel's high-performance quantum simulators. On qBraid Lab it is available as a
self-contained, pre-built environment: the `intel-quantum-compiler` (LLVM/Clang based), the Intel
Quantum Simulator and other backends, the Python interface (`intelqsdk.cbindings`), and all of the
required Intel runtime libraries are bundled together, so there is nothing to build or configure
yourself.
To cite the Intel® Quantum SDK, please reference:
> Khalate, P., Wu, X.-C., Premaratne, S., Hogaboam, J., Holmes, A., Schmitz, A., Guerreschi, G. G., Zou, X. & Matsuura, A. Y., [arXiv:2202.11142 (2022)](https://doi.org/10.48550/arXiv.2202.11142)
## Getting Started
The Intel® Quantum SDK environment is only available on the dedicated Intel Lab image. You must
launch that image first; the environment then becomes visible in the Environment Manager, where you
install it to get the Python virtual environment, the compiler, and the Jupyter kernel.
### Launch the Intel image
On your qBraid **Dashboard**, find the **Launch qBraid Lab** card and select the
**Small · Intel Quantum SDK** profile, then click **Launch**.
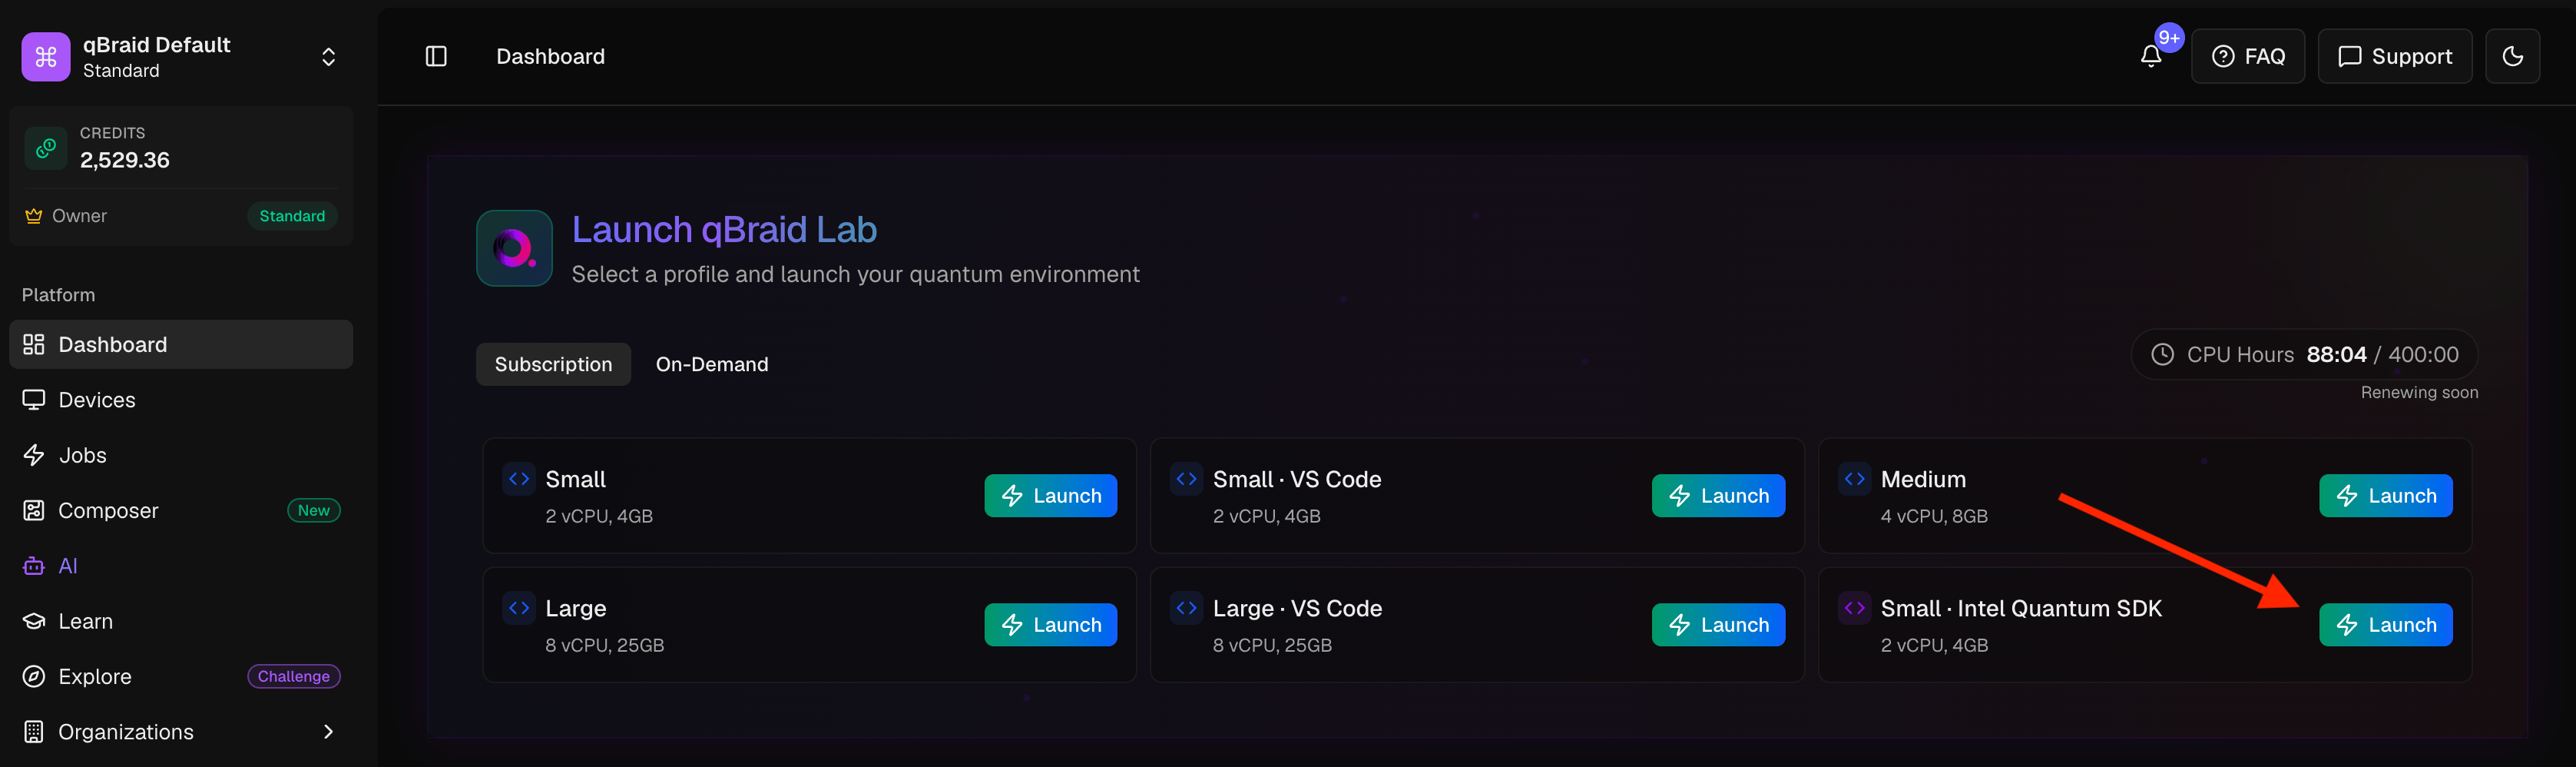
Pulling the Intel image may take 2-3 minutes the first time. The next time you launch Lab, it will
load much more quickly.
### Install the environment
1. In Lab, open the [Environment Manager](/v2/lab/user-guide/environments) sidebar and click **Add**
to browse the environments available to install.
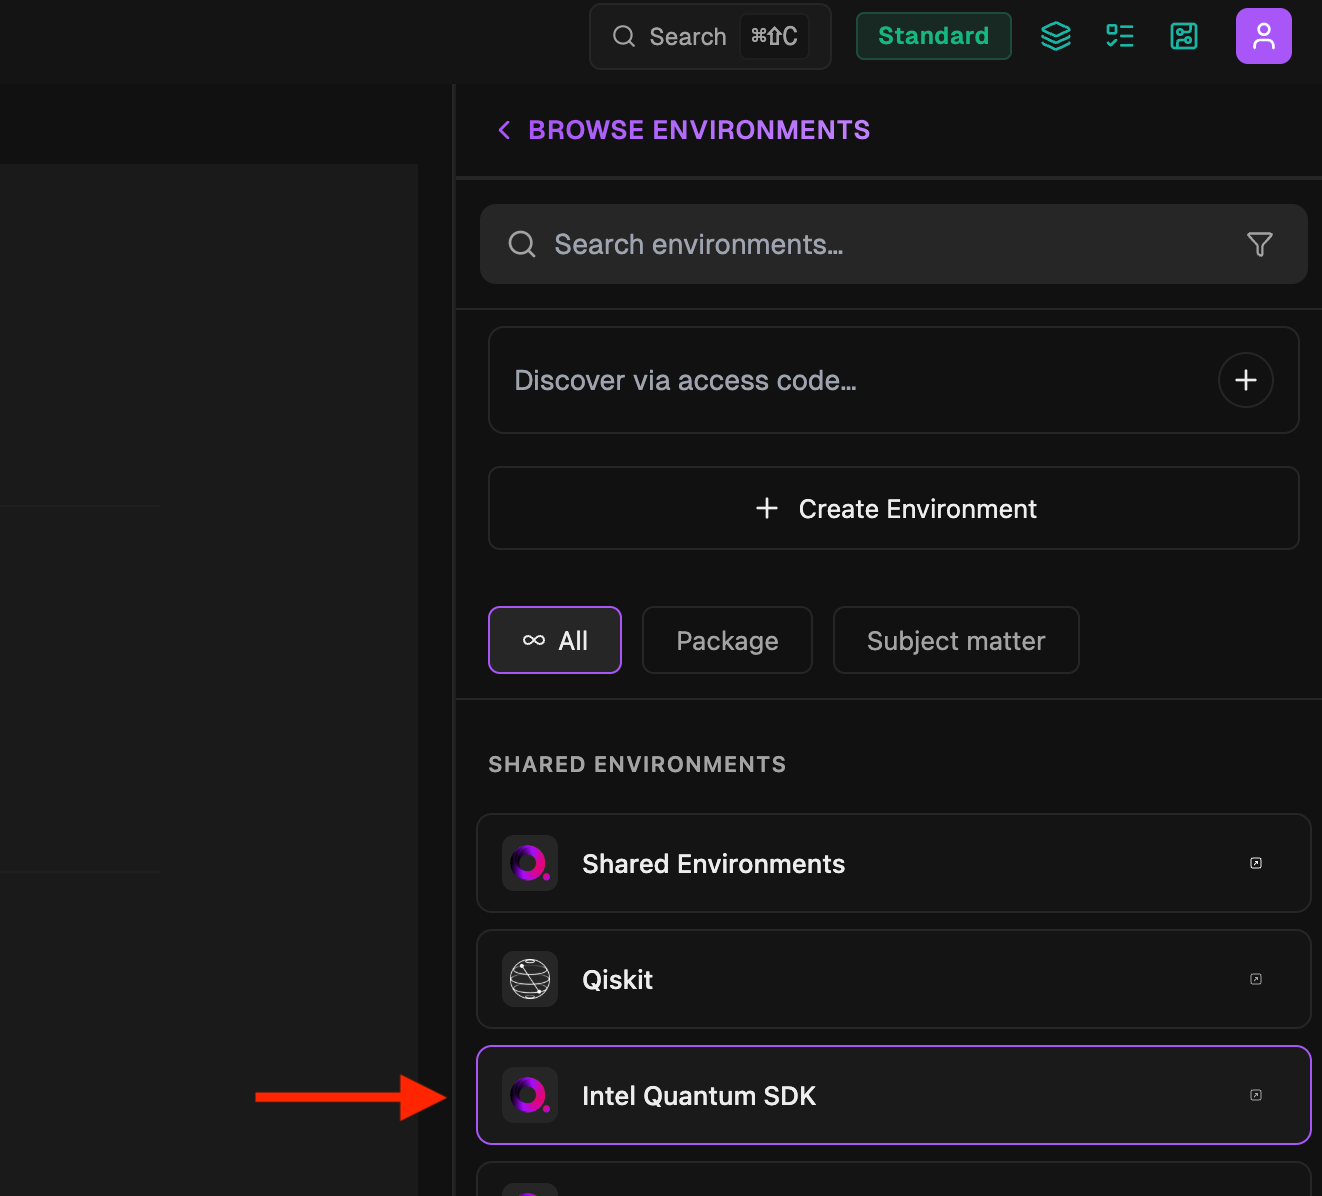
2. Environments are organized into **groups**. Select the **Intel Quantum SDK** group — the
environment does not appear in the top-level list until you open its group.
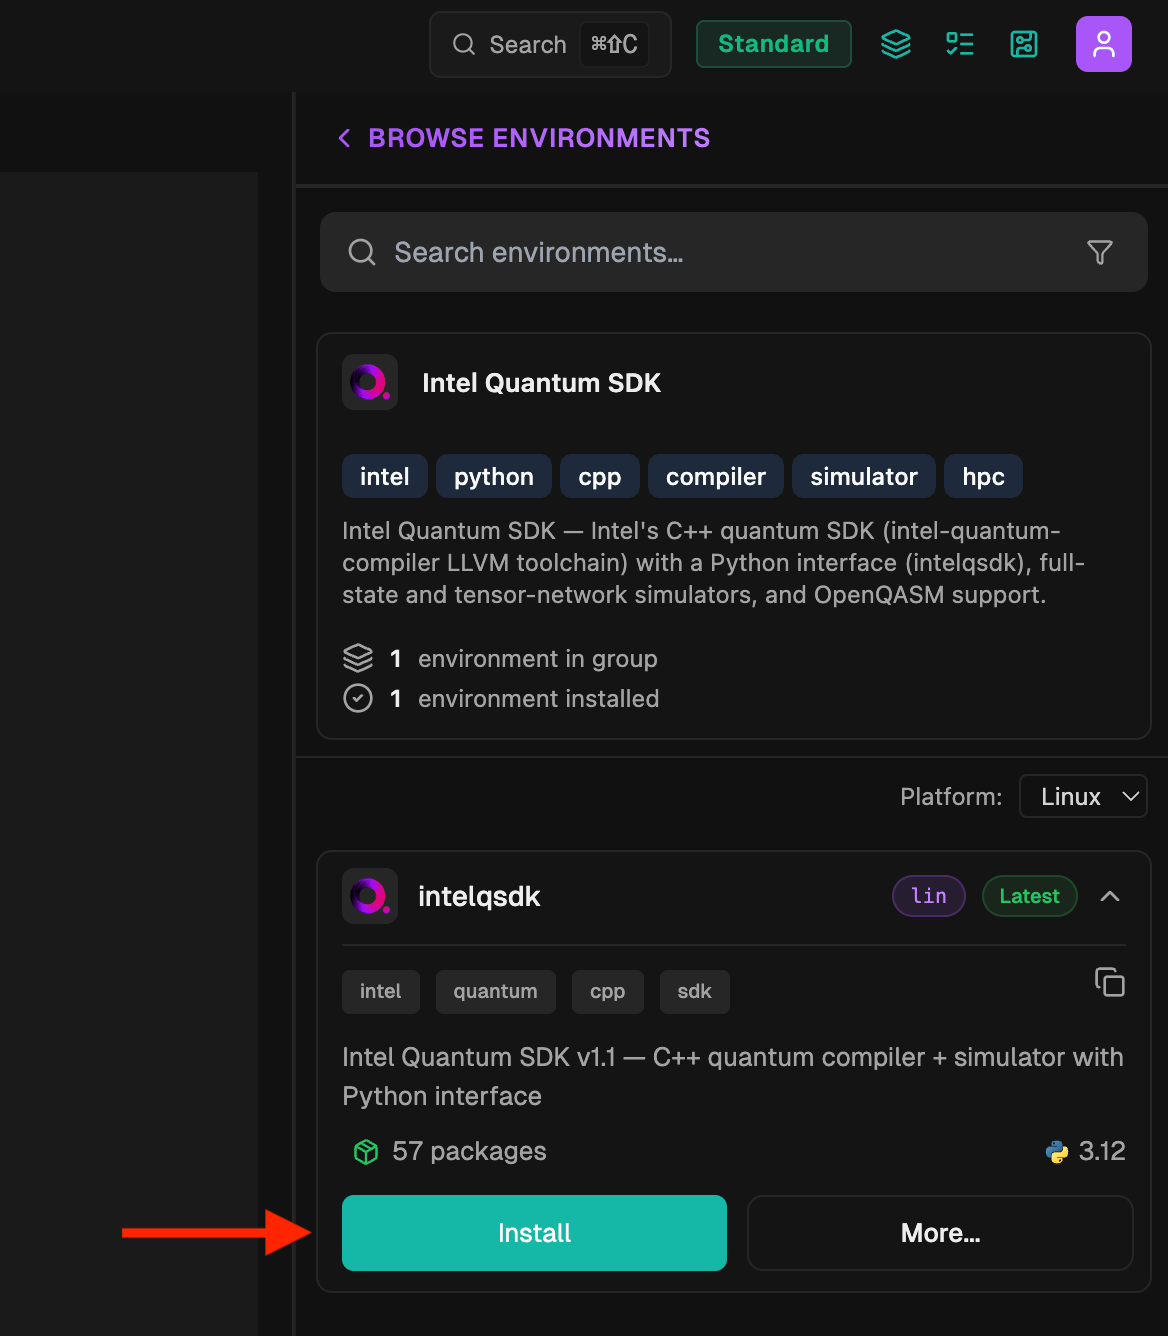
3. Inside the group, expand the **intelqsdk** environment panel and click **Install**. Installation
adds a dedicated Python virtual environment under `~/.qbraid/environments/`.
Prefer the terminal? The same environment can be installed with the qBraid CLI. Use
`qbraid envs available` to look up the environment (listed as `intelqsdk`) and its slug, then install
it:
```bash theme={null}
qbraid envs available # find the intelqsdk environment and its slug
qbraid envs install intelq_r7zabv # install by slug
```
Once installed, the environment is fully self-contained: the `intel-quantum-compiler`, the simulator
backends, the Intel MKL / MPI / OpenMP runtime libraries, and a dedicated Python interpreter all live
inside it. There is no separate `pip install` or `source` step, and nothing is drawn from a
system-wide Intel installation.
### Add the kernel
When the installation completes, the **intelqsdk** panel moves to the **Environments** tab and its
action button switches from **Installing…** to **Add kernel**. Click it to register the
**Python 3 \[Intel Quantum SDK]** Jupyter kernel, which you will select when running notebooks.
From the terminal, the kernel can instead be added with the CLI (find the environment ID with
`qbraid envs list`):
```bash theme={null}
qbraid envs list # note the intelqsdk environment ID
qbraid kernels add
```
## Python Interface
The Python interface (`intelqsdk.cbindings`) lets you write a `quantum_kernel` in C++, compile it, and
drive it entirely from Python. When you use the **Python 3 \[Intel Quantum SDK]** kernel — or the
environment's `python3` — the compiler is placed on your `PATH` and the `IQSDK_SHARE` environment
variable points at the SDK installation, so you can locate the compiler without hard-coding any paths.
Before running a notebook, make sure the Intel® Quantum SDK kernel is
[active](/v2/lab/user-guide/kernels), and that it is
[selected](/v2/lab/user-guide/notebooks#switch-notebook-kernel) for the current notebook via the
kernel picker in the top-right of the menu bar (`Python 3 [Intel Quantum SDK]`).
The following example creates a two-qubit Bell state and prints the resulting probabilities:
```python theme={null}
import os
import intelqsdk.cbindings as iqsdk
# The environment exposes the compiler location via IQSDK_SHARE.
compiler = os.path.join(os.environ["IQSDK_SHARE"], "intel-quantum-compiler")
num_qubits = 2
# Python-interpolated C++ source defining a Bell-state quantum kernel.
bell_source = f"""
#include
qbit q[{num_qubits}];
quantum_kernel void bell() {{
PrepZ(q[0]);
PrepZ(q[1]);
H(q[0]);
CNOT(q[0], q[1]);
}}
"""
with open("bell.cpp", "w", encoding="utf-8") as output_file:
output_file.write(bell_source)
# Compile to a shared object and register it under the name "bell_sdk".
iqsdk.compileProgram(compiler, "bell.cpp", "-s", "bell_sdk")
# Configure and start the full-state Intel Quantum Simulator.
iqs_config = iqsdk.IqsConfig()
iqs_config.num_qubits = num_qubits
iqs_config.simulation_type = "noiseless"
iqs_device = iqsdk.FullStateSimulator(iqs_config)
iqs_device.ready()
# Run the "bell" kernel defined in the C++ source above.
iqsdk.callCppFunction("bell", "bell_sdk")
# Collect references to the qubits and print their probabilities.
qbit_ref = iqsdk.RefVec()
for i in range(num_qubits):
qbit_ref.append(iqsdk.QbitRef("q", i, "bell_sdk").get_ref())
probabilities = iqs_device.getProbabilities(qbit_ref)
iqsdk.FullStateSimulator.displayProbabilities(probabilities, qbit_ref)
# Printing probability register of size 4
# |00> : 0.5 |10> : 0
# |01> : 0 |11> : 0.5
```
Ready-to-run examples are bundled inside the environment at `$IQSDK_SHARE/python-quantum-examples/`
(`run_ghz.py`, `run_qft.py`, `run_tfd_demo.py`). Copy one into your workspace to try it:
```python theme={null}
import os
import shutil
shutil.copy(
os.path.join(os.environ["IQSDK_SHARE"], "python-quantum-examples", "run_ghz.py"),
".",
)
```
### OpenQASM support
The environment ships a source-to-source converter that turns OpenQASM 2.0 into Intel® Quantum SDK
C++. The translator requires Python >= 3.10 and currently supports OpenQASM 2.0 as described in
[arXiv:1707.03429](https://arxiv.org/abs/1707.03429).
From Python, use the `openqasm_bridge` to translate a circuit into a C++ `quantum_kernel` source that
you can compile exactly as above:
```python theme={null}
from openqasm_bridge.v2 import translate
qasm_source = f"""
OPENQASM 2.0;
qreg q[{num_qubits}];
creg c[{num_qubits}];
h q[0];
cx q[0],q[1];
measure q[0] -> c[0];
measure q[1] -> c[1];
"""
# Returns C++ source lines; join them and write out a .cpp file to compile.
translated = translate(qasm_source, kernel_name="bell")
with open("bell.cpp", "w", encoding="utf-8") as output_file:
output_file.write("\n".join(translated))
```
Alternatively, translate an OpenQASM file directly from the terminal with the compiler's `-B` flag,
which writes the corresponding C++ `quantum_kernel` source:
```bash theme={null}
intel-quantum-compiler -B bell.qasm
```
If you start from a [Qiskit](https://www.ibm.com/quantum/qiskit) circuit, export it to OpenQASM 2.0
first (`from qiskit.qasm2 import dumps; qasm_source = dumps(circuit)`), then feed the result to the
translator. This requires Qiskit to be installed in your working environment.
## Advanced: Compiler and C++ Interface
Advanced users can work directly in C++ and drive the `intel-quantum-compiler` from a terminal. A
`quantum_kernel` program can be compiled to a standalone executable and run without Python.
### Set up a terminal session
The environment's `python3` wires up the compiler and runtime libraries automatically, but a plain
terminal session does not. For a pure C++ workflow, add the compiler to your `PATH` and the Intel
runtime libraries to your `LD_LIBRARY_PATH`. Find your environment's path with `qbraid envs list` and
substitute its ID below:
```bash theme={null}
ENV=~/.qbraid/environments/intelq_xxxx/pyenv
export PATH="$ENV/share/iqsdk:$PATH"
export LD_LIBRARY_PATH="$ENV/lib:$ENV/share/iqsdk/lib:$ENV/share/iqsdk/iqc/lib:$LD_LIBRARY_PATH"
```
### Compile and run a C++ quantum kernel
Save the following as `bell.cpp`. Unlike the Python interface, a standalone program provides its own
`main()` that configures the simulator and reads out results:
```cpp theme={null}
#include
#include
#include
#include
qbit q[2];
quantum_kernel void bell() {
PrepZ(q[0]);
PrepZ(q[1]);
H(q[0]);
CNOT(q[0], q[1]);
}
int main() {
iqsdk::IqsConfig config(/*num_qubits=*/2, "noiseless");
iqsdk::FullStateSimulator sim(config);
if (iqsdk::QRT_ERROR_SUCCESS != sim.ready())
return 1;
bell();
std::vector> qids;
for (int i = 0; i < 2; ++i)
qids.push_back(std::ref(q[i]));
auto probabilities = sim.getProbabilities(qids);
iqsdk::FullStateSimulator::displayProbabilities(probabilities, qids);
return 0;
}
```
Compile it to an executable and run it:
```bash theme={null}
intel-quantum-compiler -o . bell.cpp # -o names an output DIRECTORY, not a file
./bell
```
```text theme={null}
Printing probability register of size 4
|00> : 0.5 |10> : 0
|01> : 0 |11> : 0.5
```
### Compiler options
The `intel-quantum-compiler` differs from a standard C++ compiler in a few important ways:
* `-o ` — write output to a **directory** (not a file name). The executable or shared object is
named after the input file.
* `-s` — build a shared object (`.so`) instead of an executable. This is what the Python interface
uses under the hood.
* `-B` — translate an OpenQASM 2.0 input file into a C++ `quantum_kernel` source file.
* `-f ` — forward a flag to the underlying Clang compilation, e.g. `-f -DMY_MACRO`.
Run `intel-quantum-compiler --help` for the full list of options. Additional ready-to-run C++
examples are bundled under `$IQSDK_SHARE/quantum-examples/`, and the Intel® Quantum SDK reference
documentation (PDFs and Doxygen API HTML) is under `$IQSDK_SHARE/docs/`.
Enjoy exploring the possibilities of quantum computing with the Intel® Quantum SDK.